Environment
Unity 2021.3.16f1
Universal Render Pipeline 12.0.0
Introduction
I recently finished The Legend of Zelda: Tears of the Kingdom. To me as an indie game developer, it felt like a text book of open world game design. I had a lot of fun playing it and I learned a lot from it.
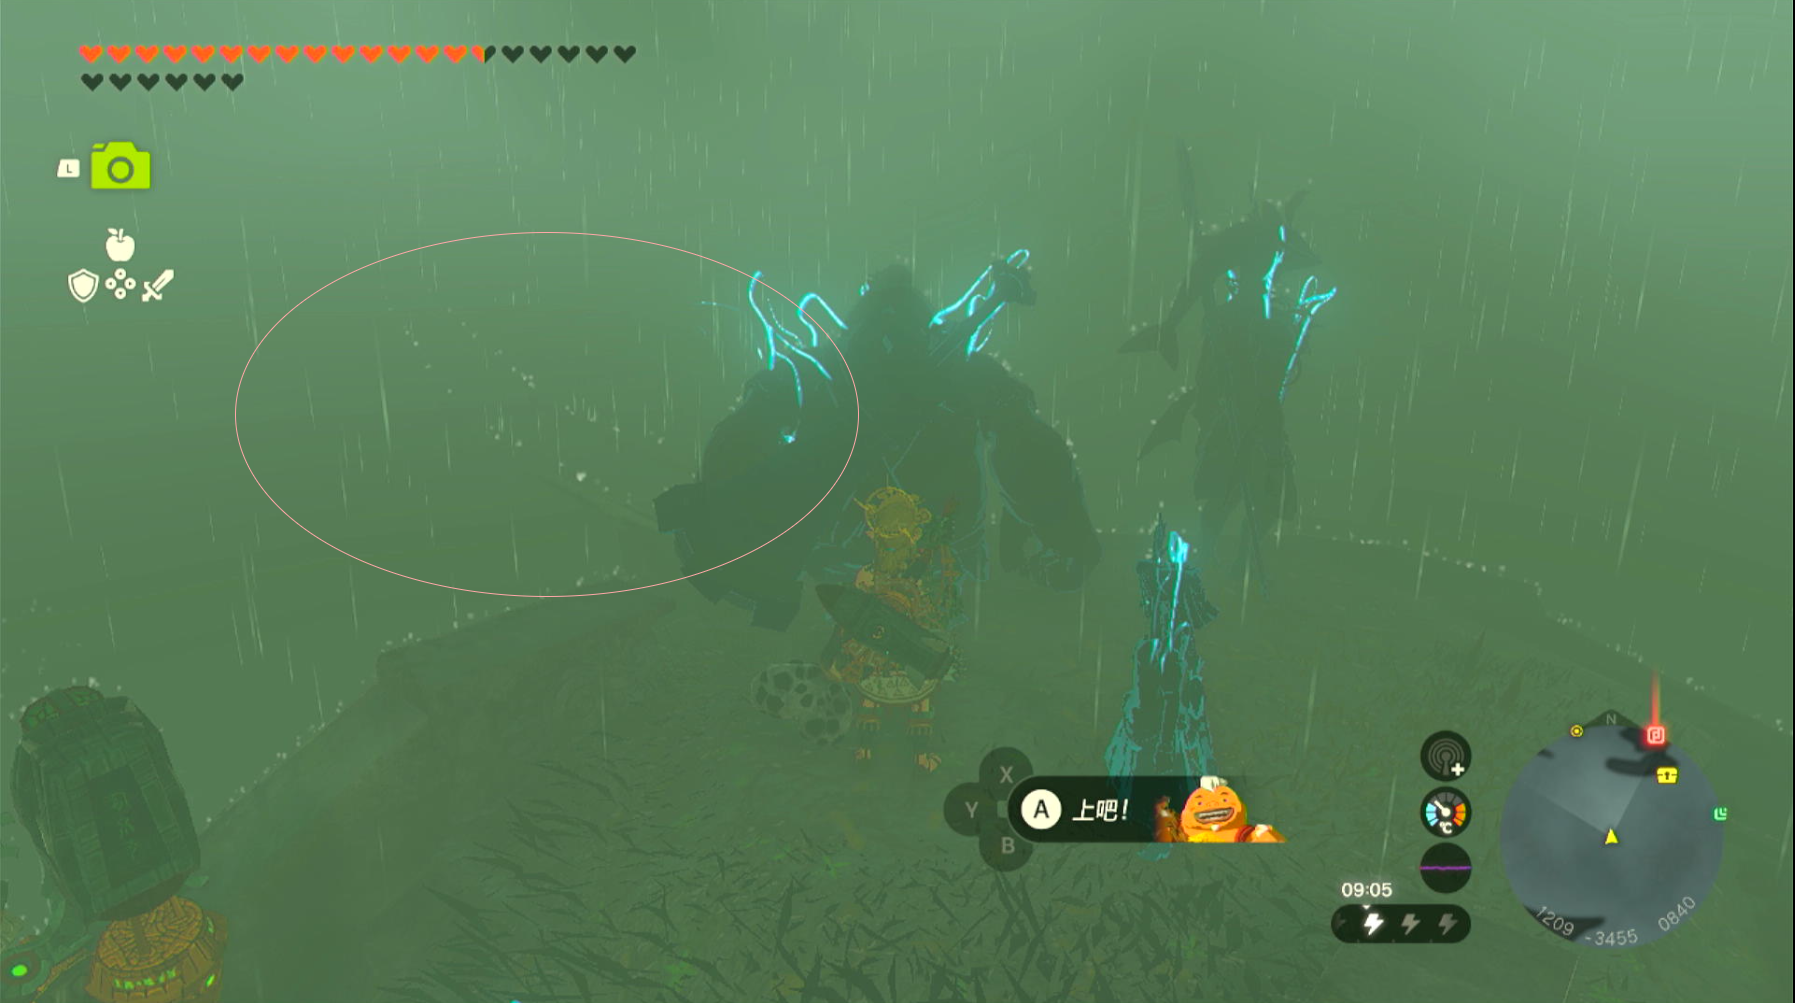
One of the things I noticed is the rain drop effect that react to the uppper edges of the scene. It’s a very subtle effect but it actually guided me through the thunder island where the player’s visibility range was less than 1 meter. In the image below, you can see that the rain drops react to the edge of the mining cart rails, which tells the player that there is a path to continue the journey. I guess probably the game designer didn’t intend to do this, but it’s Nintendo, you never know.
This effect was one of the a few things I could rely on while exploring the island, so I decided to implement it in Unity as a render feature, just to show my appreciation to those little rain drops.
Demo
How It Works
The effect basically composes of two parts: Edge detection with angle limitation and a fast scrolling noise map.
Edge Detection
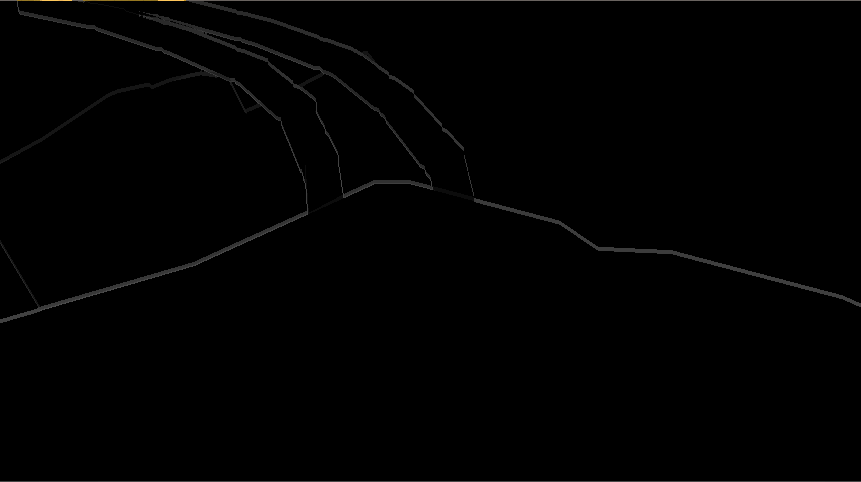
From the image above, we can see that the effect is applied even in places that have no gradient such as the rails. Therefore, it has to be using the depth buffer. With that being clear, We just need to apply a sobel edge deteciton on the depth buffer and get a edge mask.
If you are not familar with Sobel Edge Detection. Here is a quick explanation. Sobel Edge Detection is a simple edge detection algorithm that uses two 3x3 kernels to calculate the gradient of the image.
Horizontal:
-1  0  1
-2  0  2
-1  0  1
Vertical:
 1  2  1
 0  0  0
-1 -2 -1
Apply the two kernels respectively on each pixel(x,y) in the depth texture(depth):
horizontal = depth[x-1,y-1] * -1 + depth[x,y-1] * 0 + depth[x+1,y-1] * 1
           + depth[x-1,y]   * -2 + depth[x,y]   * 0 + depth[x+1,y]   * 2
           + depth[x-1,y+1] * -1 + depth[x,y+1] * 0 + depth[x+1,y+1] * 1

vertical = depth[x-1,y-1] * -1 + depth[x,y-1] * -2 + depth[x+1,y-1] * -1
         + depth[x-1,y]   * 0 + depth[x,y]   * 0 + depth[x+1,y]   * 0
         + depth[x-1,y+1] * 1 + depth[x,y+1] * 2 + depth[x+1,y+1] * 1
Then we can calculate the magnitude of the gradient by taking the square root of the sum of the squares of the two gradients:
magnitude = sqrt(horizontal * horizontal + vertical * vertical)
The magnitude is the value we are looking for. It describes the color gradient between the pixel and its neighbors. The higher the value, the more likely it is an edge.
From here, we do need one more value to describe the “direction” of the gradient. If it doesn’t make sense to you. Just think about the gradient as a vector, composed of the horizontal gradient value we calculated before and the vertical gradient value. We can calculate the angle between the gradient vector and the horizontal axis by taking the arctangent of the vertical gradient over the horizontal gradient.
angle = atan2(vertical, horizontal)
It gives us a value between -pi and pi, representing the angle of the vector in radian.
Now we have the magnitude and the angle of the gradient. We can use them to create a mask that only shows the edges we want, which are the edges that are facing up.
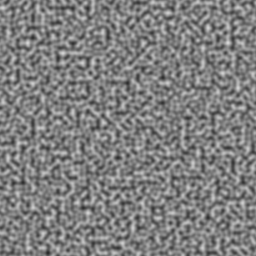
Noise Map
Congradulations to you and future me that forgot how I did this! for making it this far. Now we have the edge mask, we can just multiply a scrolling noise map on it to get the final mask.
After that, configure the settings as you like: thickness, sobel threshold, rain drop scale, drop speed, drop color, etc.
For noise map, I used a simple 2D perlin noise map that I generated from this website: http://kitfox.com/projects/perlinNoiseMaker/
Implementation
Strcutre a Render Feature
First thing is first, we need to figure out what are the main inputs of the compute shader.
- A noise texture.
- A thickness float value to control the “thickness” of the rain drops edges.
- A sobel threshold float value to control the threshold of the sobel edge detection.
- A rain drop scale float value to control the threshold of the step function that applies on the noise map to essentially control the size/density of the rain drops.
Other than these input values, we also need some parameters for the render feature to work.
- A compute shader to do the contain all the calculations.
- A RenderPassEvent to tell the render feature when to execute the render pass.
And to make it more debuggable:
- A UV scrolling speed float value to control the speed of the scrolling noise map
- A switch boolean value to turn on/off the rain drop effect in Unity Scene Editor.
Finally construct them into a Setting class inside a ScriptalbeRendererFeature. As always, you can name this class whatever you want. I named it ZeldaRainDropFeature.
using UnityEngine;
using UnityEngine.Rendering;
using UnityEngine.Rendering.Universal;
using UnityEngine.Serialization;

public class ZeldaRainDropFeature : ScriptableRendererFeature {
    [SerializeField] public Settings settings = new Settings();

    public override void Create() {
        m_RenderPass = new RainDropRenderPass(settings) {
            renderPassEvent = settings.renderPassEvent
        };
    }

    public override void AddRenderPasses(ScriptableRenderer renderer, ref RenderingData renderingData) {
        if (settings.rainDropShader != null && settings.rainDropShader != null) {
            renderer.EnqueuePass(m_RenderPass);
        }
    }

    [System.Serializable]
    public class Settings {
        public ComputeShader rainDropShader;
        public Texture2D noiseTex;
        public Color dropColor = Color.white;
        [Range(0, 20)] public int thickness = 3;
        [Range(0f, 1f)] public float sobelThreshold = 0.166f;
        [Range(0f, 1f)] public float rainDropScale = 0.5f;
        public float dropSpeed = 100f;
        public RenderPassEvent renderPassEvent = RenderPassEvent.AfterRenderingTransparents;
        public bool previewInSceneView = true;
    }
}
Create a Render Pass
Now we have the settings and a basic structure of the render feature. We can start to implement the render pass.
private class RainDropRenderPass : ScriptableRenderPass {
        private Settings m_Settings;
        private RenderTargetHandle m_ResultTex; //camera color

        public RainDropRenderPass(Settings settings) {
            m_Settings = settings;
        }

        public override void Configure(CommandBuffer cmd, RenderTextureDescriptor cameraTextureDescriptor) {
            var descriptor = cameraTextureDescriptor;
            descriptor.colorFormat = RenderTextureFormat.ARGB32;
            descriptor.enableRandomWrite = true;
            cmd.GetTemporaryRT(m_ResultTex.id, descriptor);
        }

        public override void Execute(ScriptableRenderContext context, ref RenderingData renderingData) {
            if (!m_Settings.previewInSceneView && (renderingData.cameraData.isSceneViewCamera || renderingData.cameraData.isPreviewCamera)) {
                return;
            }

            CommandBuffer cmd = CommandBufferPool.Get(name: "Screen Door Transparency");
            cmd.Clear();

            //cache color target
            var cam = renderingData.cameraData.renderer;

            var shader = m_Settings.rainDropShader;
            var mainKernel = shader.FindKernel("ScreenSpaceRainDrop");

            //sobel
            cmd.SetComputeTextureParam(shader, mainKernel, "_InputColorTex", cam.cameraColorTarget);
            cmd.SetComputeTextureParam(shader, mainKernel, "_InputDepthTex", cam.cameraDepthTarget);
            cmd.SetComputeTextureParam(shader, mainKernel, "_NoiseTex", m_Settings.noiseTex);
            cmd.SetComputeIntParam(shader, "_Thickness", m_Settings.thickness);
            cmd.SetComputeFloatParam(shader, "_EdgeThreshold", m_Settings.sobelThreshold);

            //noise
            cmd.SetComputeFloatParam(shader, "_RainDropScale", m_Settings.rainDropScale);
            cmd.SetComputeIntParam(shader, "_NoiseWidth", m_Settings.noiseTex.width);
            cmd.SetComputeIntParam(shader, "_NoiseHeight", m_Settings.noiseTex.height);
            cmd.SetComputeVectorParam(shader, "_Time", Shader.GetGlobalVector("_Time"));
            cmd.SetComputeFloatParam(shader, "_DropSpeed", m_Settings.dropSpeed);
            cmd.SetComputeVectorParam(shader, "_DropColor", m_Settings.dropColor);

            //output
            cmd.SetComputeTextureParam(shader, mainKernel, "_OutputTex", m_ResultTex.Identifier());
            cmd.SetComputeIntParam(shader, "_Width", renderingData.cameraData.camera.scaledPixelWidth);
            cmd.SetComputeIntParam(shader, "_Height", renderingData.cameraData.camera.scaledPixelHeight);

            int threadGroupX = Mathf.CeilToInt(renderingData.cameraData.camera.scaledPixelWidth / 8.0f);
            int threadGroupY = Mathf.CeilToInt(renderingData.cameraData.camera.scaledPixelHeight / 8.0f);
            cmd.DispatchCompute(shader, mainKernel, threadGroupX, threadGroupY, 1);

            cmd.Blit(m_ResultTex.id, cam.cameraColorTarget);

            context.ExecuteCommandBuffer(cmd);

            CommandBufferPool.Release(cmd);

            context.Submit();
        }

        public override void FrameCleanup(CommandBuffer cmd) {
            cmd.ReleaseTemporaryRT(m_ResultTex.id);
        }
    }
Final Code
Improvement
There are a few things I can improve in the future:
- Change the effect to Layer-based or Object-based for some very specific effects. But it will cost more performance and Tears of the kindom didn’t do that, so I guess it’s not necessary.
- Play with the noise map to get a better looking rain drop. For example, downscale the noise map to get more blurred rain drops and save performance.