Introduction
In this post, I will be discussing how I implemented a Screen-door transparency effect in Unity using URP 12. This effect is used to simulate the look of a transparent object by applying Bayer Ordered Dithering to the semi-transparent object. This effect can be used in games to give the player a better view of the character even when the character is coverd by obstacles.
How it works
You can think of this effect as using a sharp pencil to poke a dense grid of holes onto a paper to reveal the objects behind the paper. Also you can use a Threshold value to control how transparent the object is, a.k.a, how density of the grid of holes.
Shader-wise speaking, the effect can be divided into following steps:
- Prepare a temporary texture to store the result of the effect.
- Render a character-layer-only color texture using a character layer filter.
- Render a character layer depth texture.
- Render a obstacle layer depth texture to be compared with the character depth to determine whether the character is covered by obstacles.
- Send these textures with the camera RenderTarget as an texture to the compute shader to let it draw the final result onto the temporary texture we created in step#1.
- (Optional) Resize the temporary texture to the size of the camera RenderTarget.
- Blit the temporary texture onto the camera RenderTarget.
Demo
Here’s a quick demo of the effect.
Another detailed explanation of the effect, showcasing how this effect reacts to different threshold values.
From here, if you are fimiliar with the concept of render feature and render pass, and just want to see the ordered dithering part, you can skip to the #execute-method section. To see the final code, skip to here: #source-code
Environment
- Unity
2021.3.16f1 - URP
12.0.0
Implementation
From Requirements
The first thing to do before implementing anything for me in most development cases is to abstract requirements into a function and determine the inputs and outputs.
In this project, the requirements are:
- Layer-based. The user should be able to specify both the Character Layers to apply the Screen-door transparency effect on, and the layers to be used as the Obstacle Layers.
- Ordered Dithering algorithm. The user should be able to specify the Threshold of the dithering.
- Screen Space. Since the effect is layer-based, this effect should be applied in the Post-Processing Stage.
- Threshold. The user should be able to specify the threshold value for the Screen-door transparency effect to get the desired transparency effect.
To Inputs
From these requirements, we can determine that the inputs are:
| Input | Type |
|---|---|
| Character LayerMask | LayerMask |
| Obstacle LayerMask | LayerMask |
| Ordered Dithering Shader | Compute Shader |
| Threshold Value | float |
| Render Pass Event | RenderPassEvent |
Put into a Setting class, we have:
[System.Serializable]
public class Settings {
    public ComputeShader computeShader;
    public LayerMask targetLayer;
    public LayerMask obstacleLayer;
    public RenderPassEvent renderPassEvent = RenderPassEvent.AfterRenderingTransparents;
    [Range(0, 1f)] public float ditheringThreshold = 0.5f;

    //For Debugging(Optional)
    public bool previewInSceneView = true;
}
Render Pass
Structure
Now to create a new C# class that inherits ScriptableRenderPass, including settings we just created.
private class ScreenDoorRenderPass : ScriptableRenderPass {
    private Settings m_Settings;

    public ScreenDoorRenderPass(Settings settings) {
        m_Settings = settings;
    }

    public override void Configure(CommandBuffer cmd, RenderTextureDescriptor cameraTextureDescriptor) {
        //Configure render target and render texture
    }

    public override void Execute(ScriptableRenderContext context, ref RenderingData renderingData) {
        //Construct and execute command buffer
    }

    public override void FrameCleanup(CommandBuffer cmd) {
        //Release temporary textures
    }
}
Variables
Inside of the render pass, we need to create a few variables to store the temporary render textures and render target handles.
private RenderTargetHandle m_TempCameraOpaque; //camera color
private RenderTexture m_TargetOpaqueTexture; //target layer color
private RenderTexture m_TargetDepthTexture; //target layer depth
private RenderTexture m_ObstacleDepthTexture; //obstacle layer depth
Note: Don’t be scared by the type names.
RenderTargetHandle,RenderTargetIdentifier,RenderTexture, etc. They all does the same thing: storing a texture.
In GPU, each texture is associated with a unique ID.RenderTargetHandle,RenderTargetIdentifierare just wrappers around the texture ID whileRenderTextureis a wrapper around the texture itself.
Configure Method
Now we can configure the render target and render texture in the Configure function.
public override void Configure(CommandBuffer cmd,RenderTextureDescriptor cameraTextureDescriptor) {
    var descriptor = cameraTextureDescriptor;
    descriptor.enableRandomWrite = true;
    cmd.GetTemporaryRT(m_TempCameraOpaque.id, descriptor);

    m_TargetOpaqueTexture = RenderTexture.GetTemporary(cameraTextureDescriptor.width, cameraTextureDescriptor.height, 0, RenderTextureFormat.ARGB32);
    m_TargetDepthTexture = RenderTexture.GetTemporary(cameraTextureDescriptor.width, cameraTextureDescriptor.height, 16, RenderTextureFormat.Depth);
    m_ObstacleDepthTexture = RenderTexture.GetTemporary(cameraTextureDescriptor.width, cameraTextureDescriptor.height, 16, RenderTextureFormat.Depth);
}
Frame Cleanup Method
Finish the FrameCleanup function while we still remember.
public override void FrameCleanup(CommandBuffer cmd) {
    cmd.ReleaseTemporaryRT(m_TempCameraOpaque.id);
    RenderTexture.ReleaseTemporary(m_TargetOpaqueTexture);
    RenderTexture.ReleaseTemporary(m_TargetDepthTexture);
    RenderTexture.ReleaseTemporary(m_ObstacleDepthTexture);
}
Execute Method
Finally, we can start to write the Execute function where the actual rendering logic locates. Since the code is relatively long, I will explain it in chunks.
// Fetch a command buffer from the command pool, remember to release it at the end of the function
CommandBuffer cmd = CommandBufferPool.Get(name: "Screen Door Transparency");

// Clear the command buffer in case there are some commands left
cmd.Clear();
Command buffers are used to store GPU commands. We can think of it as a list of GPU commands.
After fetching the command buffer, prepare the drawing settings for drawing opaque(colored) texture for Character layer(the layer that’s needed to be revealed from obstacles).
// Prepare the drawwing setting for opaque texture (for character layer)
var drawOpaqueSettings = CreateDrawingSettings(new ShaderTagId("UniversalForward"), ref renderingData, SortingCriteria.BackToFront);

// Prepare the drawing setting for depth-only mode
var drawDepthSettings = CreateDrawingSettings(new ShaderTagId("DepthOnly"), ref renderingData, renderingData.cameraData.defaultOpaqueSortFlags);

// Prepare the filtering setting for character layer
var targetFilter = new FilteringSettings(RenderQueueRange.all, m_Settings.targetLayer.value);

// Prepare the filtering setting for obstacle layer
var obstacleFilter = new FilteringSettings(RenderQueueRange.all, m_Settings.obstacleLayer.value);
Now render all the textures using the settings we just created.
//draw target opaque
cmd.SetRenderTarget(m_TargetOpaqueTexture);
cmd.ClearRenderTarget(true, true, Color.clear);
context.ExecuteCommandBuffer(cmd);
cmd.Clear();
context.DrawRenderers(renderingData.cullResults, ref drawOpaqueSettings, ref targetFilter);

//draw target depth
cmd.SetRenderTarget(m_TargetDepthTexture);
cmd.ClearRenderTarget(true, false, Color.clear);
context.ExecuteCommandBuffer(cmd);
cmd.Clear();
context.DrawRenderers(renderingData.cullResults, ref drawDepthSettings, ref targetFilter);

//draw obstacle depth
cmd.SetRenderTarget(m_ObstacleDepthTexture);
cmd.ClearRenderTarget(true, false, Color.clear);
context.ExecuteCommandBuffer(cmd);
cmd.Clear();
context.DrawRenderers(renderingData.cullResults, ref drawDepthSettings, ref obstacleFilter);

//reset render target
var cam = renderingData.cameraData.renderer;
cmd.SetRenderTarget(cam.cameraColorTarget, cam.cameraDepthTarget);

//cache camera color which will be used later in the compute shader as a source texture
cmd.Blit(cam.cameraColorTarget, m_TempCameraOpaque.Identifier());
Note
The commands insideCommandBufferwon’t be executed beforecontext.ExecuteCommandBuffer(cmd). Thereforecontext.ExecuteCommandBuffer(cmd)is needed before everycontext.DrawRenderers(...)to make sure the commands are executed before we draw any textures.
At this point, we have rendered all the textures we need. Now we can pass them to the compute shader:
//get kernel
var shader = m_Settings.computeShader;
var mainKernel = shader.FindKernel("BayerOrderedDithering");

//set textures and parameters
cmd.SetComputeTextureParam(shader, mainKernel, "_InputTexture", cam.cameraColorTarget);
cmd.SetComputeTextureParam(shader, mainKernel, "_TargetOpaqueTexture", m_TargetOpaqueTexture);
cmd.SetComputeTextureParam(shader, mainKernel, "_TargetDepthTexture", m_TargetDepthTexture);
cmd.SetComputeTextureParam(shader, mainKernel, "_ObstacleDepthTexture", m_ObstacleDepthTexture);
cmd.SetComputeTextureParam(shader, mainKernel, "_OutputTexture", m_TempCameraOpaque.Identifier());
cmd.SetComputeFloatParam(shader, "_DitherThreshold", m_Settings.ditheringThreshold);

//define thread group size
int threadGroupX = Mathf.CeilToInt(renderingData.cameraData.camera.scaledPixelWidth / 8.0f);
int threadGroupY = Mathf.CeilToInt(renderingData.cameraData.camera.scaledPixelHeight / 8.0f);

//dispatch compute shader
cmd.DispatchCompute(shader, mainKernel, threadGroupX, threadGroupY, 1);

//draw the result back to screen
cmd.Blit(m_TempCameraOpaque.id, cam.cameraColorTarget);
The denominator when calculating the threadGroup sizes must match the numthreads attribute in the compute shader to get a full screen processing, in my compute shader it is set to [numthreads(8,8, 1)], there fore we divide the screen width and height by 8.
At this point, we have defined all the commands for the ComputeBuffer. Now we just need to execute it.
//submit commands to the GPU
context.ExecuteCommandBuffer(cmd);

//release command buffer from RAM
CommandBufferPool.Release(cmd);

//might be unnecessary, unity will do this for us in the end of execute method, but just in case
context.Submit();
Now we have finished our ScreenDoorRenderPass.
Render Feature
To use the render pass we just created, create a new C# class that inherits ScriptableRendererFeature.
using UnityEngine;
using UnityEngine.Rendering;
using UnityEngine.Rendering.Universal;

public class ScreenDoorRenderFeature : ScriptableRendererFeature {
    [SerializeField] public Settings settings = new Settings();

    ScreenDoorRenderPass m_RenderPass;

    public override void Create() {
        m_RenderPass = new ScreenDoorRenderPass(settings) {
            renderPassEvent = settings.renderPassEvent
        };
    }

    public override void AddRenderPasses(ScriptableRenderer renderer, ref RenderingData renderingData) {
        if (settings.computeShader != null && settings.targetLayer != 0 && settings.obstacleLayer != 0) {
            renderer.EnqueuePass(m_RenderPass);
        }
    }
}
What’s going on here is relatively simple. We create a new ScreenDoorRenderPass and set its renderPassEvent to the one we defined in the inspector. Then we add the render pass to the renderer’s queue.
And that’s it! Now we can use the render feature in our renderer settings.
Source Code
Source Code: Screen Door Transparency
Renderer Asset
Note The basic setup for an URP project is not part of the scope for this article. If you don’t know how to do that, please refer to this manual page: InstallURPIntoAProject.
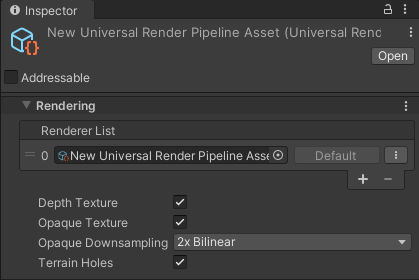
Make sure to enable opaque texture and depth texture in the URP asset.
Find your URP renderer asset and add the render feature we just created.
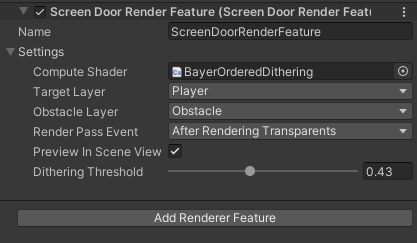
For example, in the video demo, the layer for the green boxes are set to be osbatcle layer, and the layer for the orange balls are set to be target layer.
Future Improvements
- Add a dropdown menu to the render feature to allow the user to select different sizes of Bayer Matrixes.
- Support Transparent objects.
- Optimize the performance of the render feature by reducing the size of the temporary textures.
- The current project I’m working on doesn’t require a object-based Screen Door Effect. But if you need it, you can just add a oredered dithering pass to the shader.
References
Ordered Dithering - Computerphile
https://youtu.be/IviNO7iICTM
Ordered dithering - Wikipedia
https://en.wikipedia.org/wiki/Ordered_dithering